I've already introduced you to our new coffee table here, but I wanted to give some sort of update (as small as it may be).
To recap: we already owned a perfectly good coffee table, but when we saw this guy at the Goodwill for $22.00, there was just no passing it up. For a few weeks it lived in our garage, until the weekend we decided to tackle the refinishing. I've never refinished anything before, but I figured it couldn't be that hard.
The very first step is to remove all the hardware, screws, chains...pretty much anything that's not wood. Introducing my power-tool-wielding husband...
I worked with the manual screwdriver on one side, while he worked on the other. Everything was going pretty well until we hit a problem - some screws were so old and tight that the power screwdriver just drove right through them. That left us with a completely worn drill-bit (which we still haven't replaced) and a whole lot of this:
After a while, we finally got everything removed. Initially we were hoping to reuse the screws and brackets, but they were just too old. We're definitely going to reuse the little chains that hold the doors open.
Next step? Breaking out the stripper! (No, not that kind of stripper...) We used a '15 minute' stain remover which we brushed on with natural bristled paint brushes (don't use synthetic, they'll disintegrate). I don't know if you've ever read the back of a can of paint stripper, but holy crap that stuff is frightening. They pretty much scare the bejesus out of you, which lead to us purchasing gloves, goggles and suiting up in long pants and shirts (it was hot out!).
So, let's take a time-out to talk about what I was expecting when it came to stripping wood. I really thought we were going to brush on the goo, wait fifteen minutes and voila...
That did NOT happen that way. At all. I started to panic a little and then called every person I know who had ever stripped furniture. That's when my mom told me the bad news: it can take several applications before any stain comes off. Darn. Also, I am pretty sure we weren't laying it on thick enough for the stripper to work well. Sooooo, back to the drawing board.
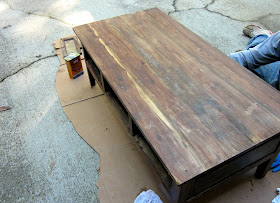
After about four coats, we got it to this point:
It's hard to tell, but that really was an amazing improvement from this:
You can see that the sheen is gone and the natural wood tone is starting to appear. We had something to do that night, so we were never able to finish it and haven't been able to work on it since. Hopefully this we can make more progress soon and actually finish it!


No comments:
Post a Comment