I am back from my blogging sabbatical with the most exciting reveal ever. (Humor me - I'm really excited).

I'm sure everyone is aware of how obsessed I am with the Pottery Barn Seagrass Headboard:

Not so thrilled with the price - after surcharges, delivery and taxes, we're talking well over $500. That's just too much for me to stomach. After checking Craigslist at least once a day, I began to lose hope that I would ever find a seagrass headboard for my guest room. But as always, Craigslist did not let me down! I came across a listing for this Pottery Barn 5x8 Seagrass rug for $40! Did I need a rug? Not exactly, but for $40 I knew I could not pass up the opportunity. I figured I could find a place for it somewhere in the house.
Here is it when I got it home:

It stayed rolled-up in the guest room for a week or so before I came up with a brilliant idea: using it to make my very own seagrass headboard! Of course I thought it was nuts and I had no idea how it would work. My first source of inspiration was Censational Girl's tutorial. I took the basic ideas (plywood, foam, staples) and decided I could apply them to the rug. Let me just state that I don't think this would have worked with a cheaper rug - we have a seagrass from Lowe's in the living room and it's just not that pliable. The Pottery Barn version was much softer and easier to manipulate.
The first step was to see if I could remove the fabric border:

It was beyond easy. All you have to do is snip the thin plastic thread and just rip. It only took about 10 minutes to get it all cleared.


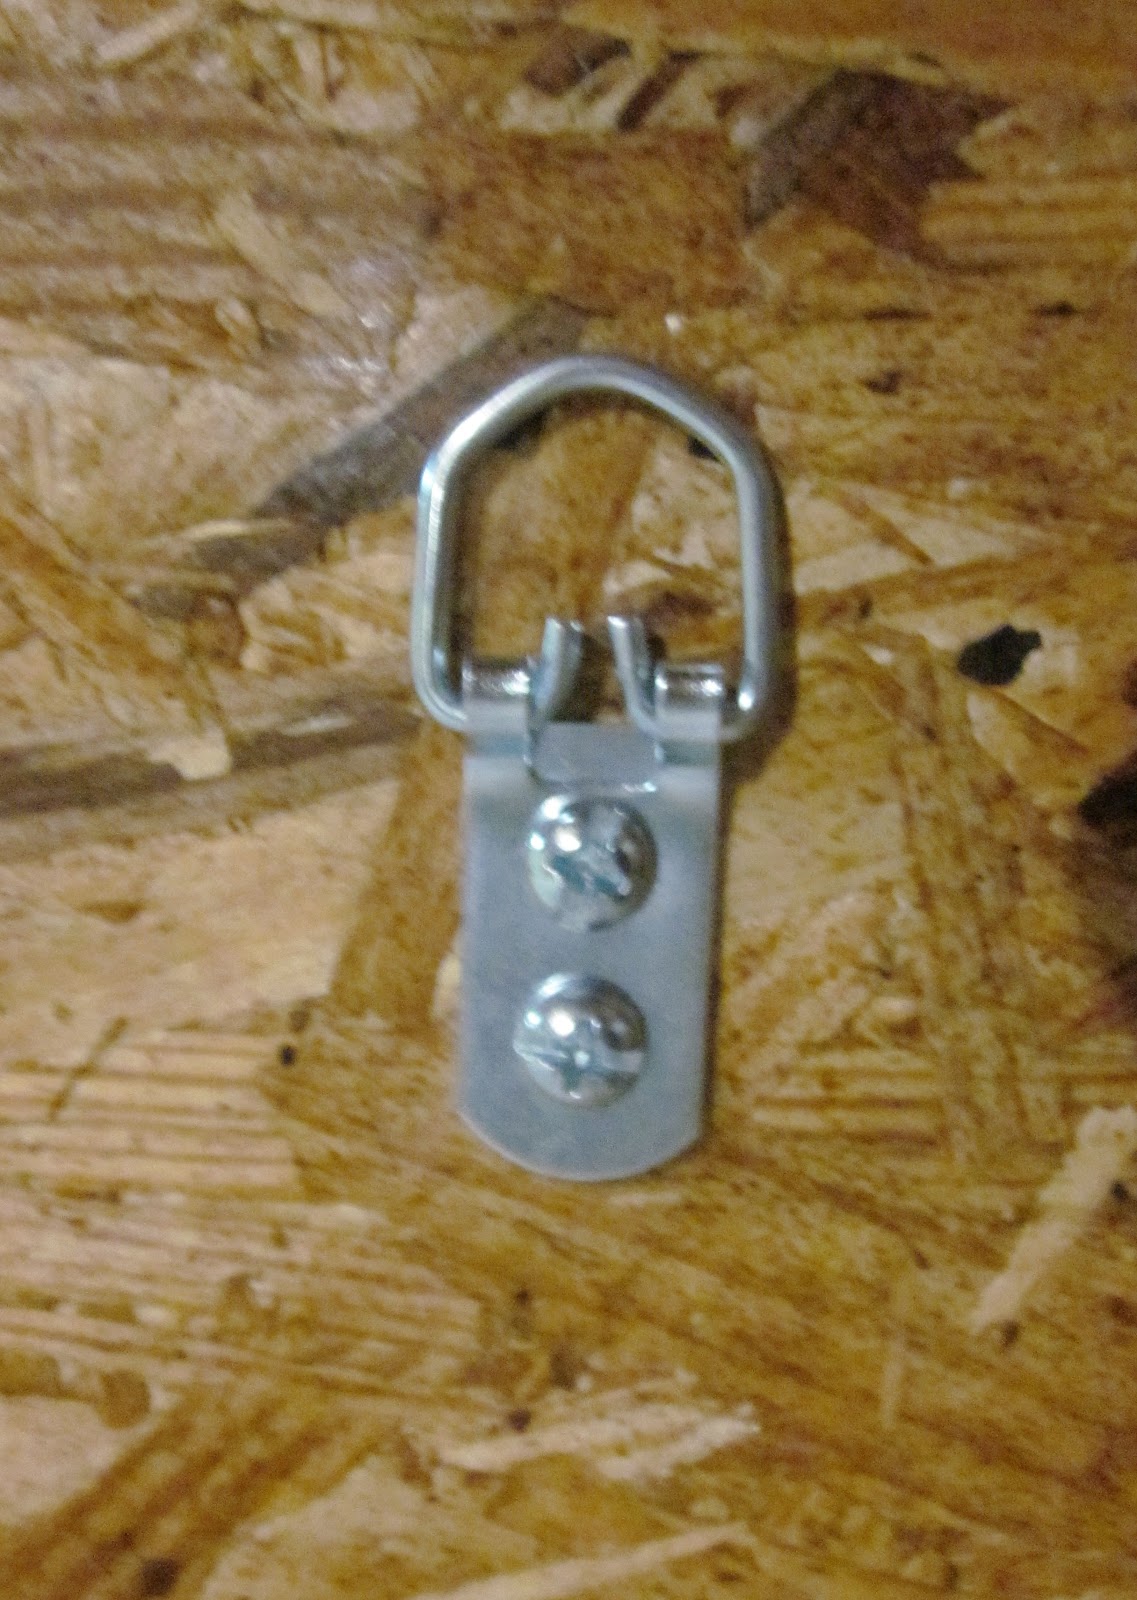
Then we were off to Lowe's to buy some wood and hanging hooks. We chose to use OSB board since it was cheap and no one would ever see it. Here is the board after Brian cut it down to size and curved the top. (I did not document this process, but he said he used string to lay out the radius and then a jigsaw to make the cut.)

We also decided to hang the headboard directly on the wall. Not only was this easier (no legs to cut and measure and no attaching to the bed rails) but it also gave us the flexibility to move the headboard up or down to get the look we wanted.
After laying out a sheet of plastic in the garage, Amber and I got to work:


I decided to go with 1-inch foam for no other reason other than it was cheap. Seriously, foam is expensive. If I had measured and planned correctly, I would have spent less money, but since I just eye-balled it, I had to go back to Hobby Lobby to buy another roll of foam. We used spray adhesive to attach it to the OSB.

Then finally, it was time to wrap!

Brian didn't really trust us with the air compressor/staple gun, so he took over from here. (But we did help pull the fabric taut)


From the first moment we laid the rug down, I had not been able to see what the front of it was looking like. I had really low expectations that it would come out good, so when Brian finally flipped it over I screamed like a little girl!

Aside from the bad garage lighting, it looked amazing. It's not 100% done yet - I still need to glue a few pieces down on the back and I am looking into how to clear-coat it, but check out the after pictures:


Yes, those picture suck. It was dark, bad lighting and I have a simple point-and-shoot. (I think fancy camera is on my Christmas list for next year). Hopefully I can get some better shots soon. Let me break down the costs for you:
- 5x8 Pottery Barn Seagrass Rug = $40.00 on Craigslist
- OSB Board + Hooks = $9.00 (we used a Lowe's giftcard, but I think the original total was $25
- Two rolls of foam = $30.00
- Staples and staple gun = already owned
Grand DIY Total? $79.00
Pottery Barn Tota? $500+
I can barely tell the difference!

Amazing, amazing idea!!! i have been looking for a headboard for some time now and they are super expensive and way out of my price range. This is just a wonderful idea. Thank you so much for sharing all your tips and tricks with us. I'm a new follower and I can proudly say that I am 100% obsessed with your blog. :D
ReplyDeleteThank you so much for the nice comment! PB is always out of my price range, so I am constantly looking for cheaper alternatives. Hopefully I can come up with some more!
ReplyDeleteThanks for reading :)
Victoria you are a wise and cleaver woman. Now I am going to do that...because I to have been looking ob CL for about 8 weeks and nada!!
ReplyDeleteThanks.....
omg!!i love ur idea!
ReplyDeleteI have been looking for an inexpensive seagrass headboard for our guestroom too! Everything out there is pretty steep IMO; but, then low and behold I found this page!!!! Wow, you did an awesome job - you can't tell the difference from the PB one! and I really like the idea of hanging it on the wall, makes better sense. You page has now given me the inspiration to try the same.
ReplyDeleteI do have one question. What size is your bed...full or queen? And what dimensions did you end up cutting the board to?
Janet - thank you SO much for such a nice comment. I am happy to help fellow seagrass headboard lovers...who don't love the price!
DeleteThe bed we have in that room is a queen and I actually just copied the measurements directly from the Pottery Barn website. We even used the height they listed to see how high we should hang it on the wall! Let me know if I can be of any more help.
Cool. Cool. Cool. I have that rug too in my living room and in it's next life it's going to be on my headboard - LOVE your idea! I've got this linked to my DIY headboards post too today, well done!
ReplyDeleteThank you so much for featuring my headboard!
Deleteyours looks better than the pottery barn!
ReplyDeleteThank you!!
DeleteThis is fantastic- I am going to Lowes now!!!!!! Thanks you- I have wanted this headboard for so long but it was not in my budget!
ReplyDeleteMargyani - I am so glad this helped you! I also lusted over the PB version for so, so long and knew I could never afford it! Please send me pictures if you finish it!
DeleteYou are GENIUS! A girl after my own heart. Planning to make one for my guest room at my beach house. Can't wait to go accessory shopping with all the money your saved me. Thank you, thank you.
ReplyDeleteThank you!! What a sweet comment. Have fun accessory shopping!
DeleteAwesome!!! gotta do this!!!!!!!!!!!!
ReplyDeleteLove it! Did you need an air compressor staple gun for this job, or do you think you could do it with with a regular one?
ReplyDeleteWe definitely used an air compressor, which I think helped make it so easy...but I don't think its impossible to do with a regular nail gun. You may need to get some extra long staples and even possibly hammer in some nails in some spots. Good luck!
DeleteHow did you clear coat it?
ReplyDeleteI never did get around to clear-coating it. Surprisingly, there have been NO issues with it at all!
DeleteWow! Very impressive work. Can I hire you to do some DIY for me?
ReplyDeleteThink of the other possibilities!
ReplyDeleteThanks so much for the idea!!! This will help to end my search!! Make it a great day. Mine just got better!!!!
ReplyDeletewow!!!! you nailed this.....looks very expensive! great job
ReplyDeleteGreat Article it its really informative and innovative keep here: with new updates. Its was really valuable. Thanks a lot. bed banging
ReplyDeleteJust another tip…you could purchase a twin bed topper for the foam from Walmart for around $12! Also, I just made a beautiful headboard with $50 worth of bamboo fencing found on FB marketplace. Wish I could attach a picture.
ReplyDelete